Download example Python project here: working_directory
Step 1: Set up your Visual Studio Code environment
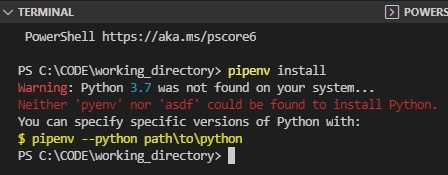
Open a terminal window and enter the command pipenv install
On attempting this install you may get the following error:
Warning: Python 3.7 was not found on your system…
Neither ‘pyenv’ nor ‘asdf’ could be found to install Python.
You can specify specific versions of Python with:<code>
$ pipenv –python path\to\python
Python version not found
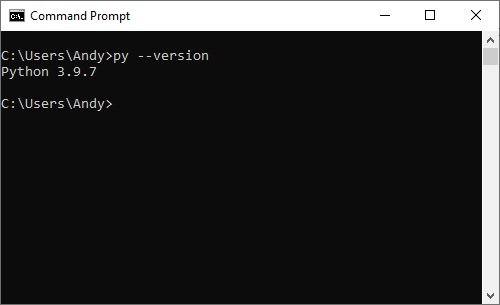
If this is the case first verify the version of Python you have by using the command py --version in a command prompt:
Obtain Python version
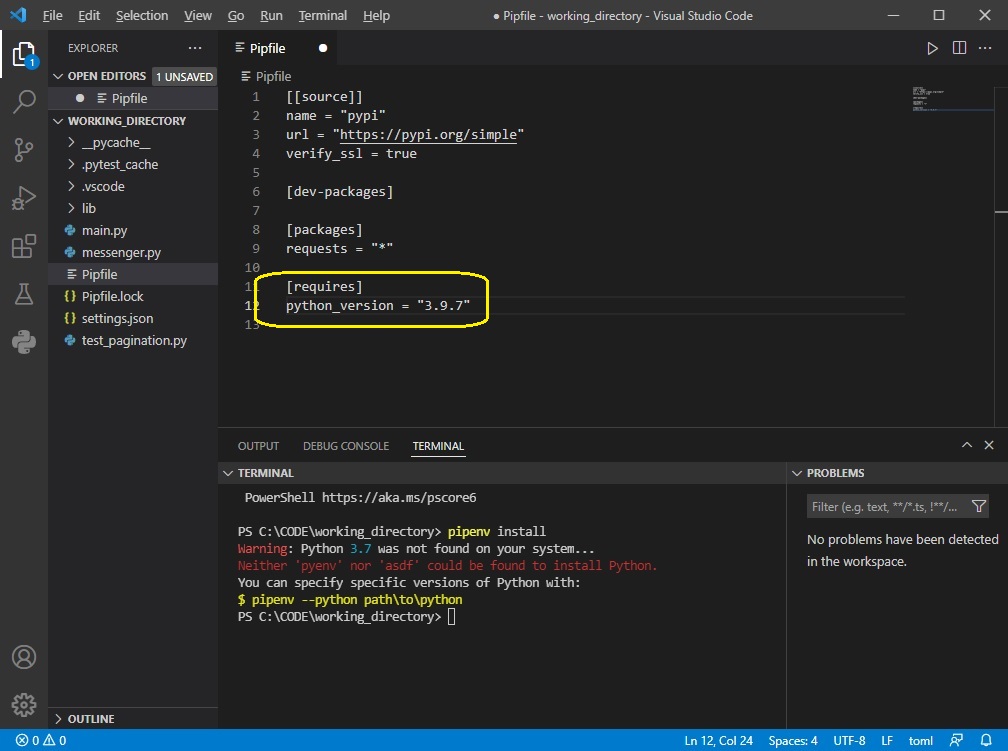
Then open the PipFile and ensure the version of Python you have installed is consistent with the version you have installed:
PipFile Python version
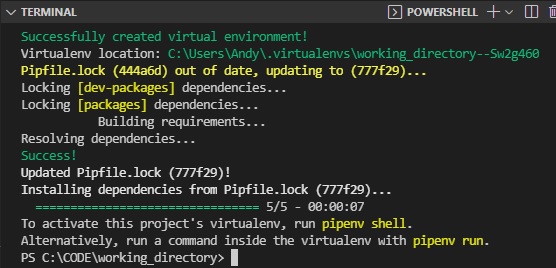
Save the PipFile change and run the pipenv install command again. This time it should return with success-like messages:
pipenv install success
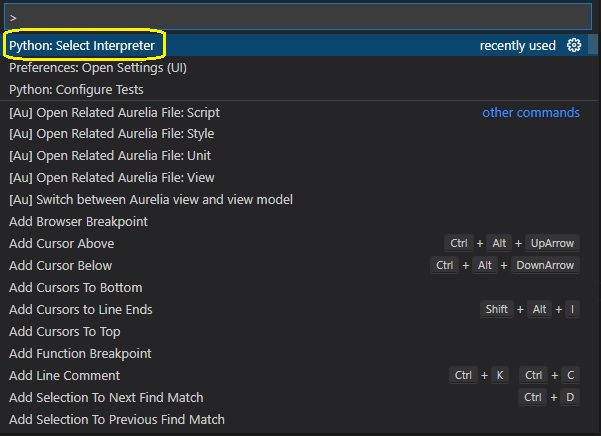
In Visual Studio Code select the Python interpreter by selecting Ctrl + Shift + P
Select Python interpreter
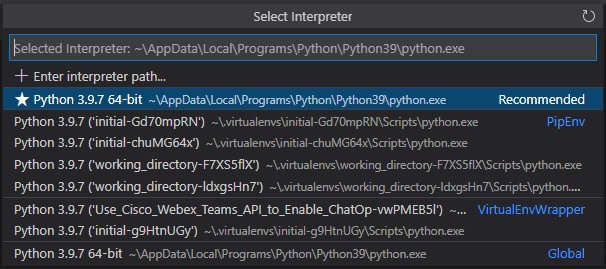
Select the most recent:
most recent Python interpreter
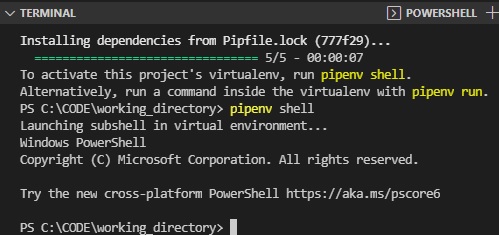
Run pipenv shell
pipenv shell
Step 2: Update the source code
The get_messages method sends a request to the API URL, provided in the api_url variable and prints the JSON-formatted response. The maximum number of items per page is defined in the max variable and is set to 3.
messenger.py
import json
from urllib.parse import urlparse, parse_qs
import requests
from pprint import pprint

# API Key is obtained from the Webex Teams developers website.
api_key = 'MzcwZThhMGUtNTc0Yy00ZGE3LWEwN2YtYzk1MzY2NWE5YTNlOGIwMzM2NWEtYzIz_PF84_consumer'
# roomId is a required parameter when fetching messages,
# and identifies the space (room) from which the messages will be retrieved.
# roomId can be configured here, or collected by the set_room_id method
room_id = 'Y2lzY29zcGFyazovR1'
# Maximum number of messages per page
max_items = 3
# Webex Teams messages API endpoint
base_url = 'https://api.ciscospark.com/v1/messages'


class Messenger():
    def __init__(self, base_url=base_url, api_key=api_key, room_id=room_id, requests=requests):
        self.base_url = base_url
        self.api_key = api_key
        self.room_id = room_id
        self.max_items = max_items
        self.api_url = f'{self.base_url}?roomId={self.room_id}&max={self.max_items}'
        self.headers = {
            "Authorization": f"Bearer {api_key}",
        }
        self.requests = requests

    def get_messages(self):
        """ Get a list of messages in a room.
        Maximum number of items per page is set to 3 """
        print(f'Requesting {self.api_url}')
        self.response = self.requests.get(self.api_url, headers=self.headers)
        print(json.dumps(self.response.json(),indent=4))
        return self.response


    def has_next_page(self):
        """ Check if more pages are available and set the cursor to next page.
        URI is parsed from the response Link Header """

    def _get_parsed_link_header(self):
        """ Parse the relation type and the URL from the Link Header.
        Construct a dictionary of query parameters """
        link_header = {}
        link_header["rel"] = requests.utils.parse_header_links(
            self.response.headers["Link"]
        )[0]["rel"]
        link_header["url"] = requests.utils.parse_header_links(
            self.response.headers["Link"]
        )[0]["url"]
        link_header["params"] = parse_qs(
            urlparse(
                requests.utils.parse_header_links(
                    self.response.headers["Link"]
                )[0]["url"]
            ).query
        )
        print('PARSED Link HEADER')
        print(json.dumps(link_header, indent=4))
        return link_header

    def reset_cursor(self):
        """ Set the cursor back to the first page.
        The initial URL is constructed from the base_url, room_id and max variables."""
        self.api_url = f'{self.base_url}?roomId={self.room_id}&max={self.max_items}'

    def print_current_page(self):
        """ Print just the text of the messages
        on the current page """
        for msg in (self.response.json())['items']:
            print(msg['text'])
        print()

    def set_room_id(self):
        """ Retrieves the room memberships for the bot
            and sets the room_id variable to the first roomId in the list """
        self.response = self.requests.get(
            "https://api.ciscospark.com/v1/memberships",
            headers=self.headers,
        )
        room_list = self.response.json().get("items")
        for room in room_list:
            print(f"roomId: {room.get('roomId')}")
            print(
                f"personDisplayName: {room.get('personDisplayName')}"
            )
            print()
        self.room_id = room_list[0].get("roomId")
        self.api_url = f"{self.base_url}?roomId={self.room_id}&max={self.max_items}"
        print(f"##### room_id SET TO {self.room_id}\n")
        return self.room_id
test_pagination.py
In this section we update the unit test for retrieving messages from a Webex Teams room and use dependency injection to create mock requests to the API, so there is no need to implement proper authentication. Run the tests with a Visual Studio Code extension.
This class extends the unittest.TestCase class. The msg object is an instance of the Messenger class. A mocked requests library is passed to the constructor.
The test consists of several steps. First, a request is made to the Webex Teams API to fetch the first page of messages in the specified room. Then, a check is performed to see if more data is available. In this case, this would mean that there were more messages posted in this room than can be retrieved in one page of results. The last step is to retrieve the first and the next page of messages.
#!/usr/bin/env python3

# Testing pagination on Webex Teams API. Created mock requests modul in mock_requests.py
# First we provide a precoded example of an API call to webex teams (mocked).
# A rel="next" link header will be present if another page of results is available.
# We will use the 'beforeMessage' cursor (which points to a message id), not 'before' (which is a date cursor)

from lib import mock_requests
from messenger import Messenger
import unittest
from pprint import pprint
import json


class MessageTest(unittest.TestCase):
    def setUp(self):
        self.msg = Messenger(requests=mock_requests)

    def test_get_messages(self):
        # Check if any messages exist
        messages = self.msg.get_messages().json().get('items')
        self.assertGreater(len(messages), 0)


    def test_has_next_page(self):
        # Check if there are more pages of messages available
        self.msg.get_messages()
        self.assertTrue(self.msg.has_next_page())

    def test_get_next_page(self):
        # Get the first page
        print('GET FIRST PAGE')
        messages = self.msg.get_messages().json().get('items')
        self.assertGreater(len(messages), 0)
        self.assertTrue(self.msg.has_next_page())

        # Get the next page
        print('GET NEXT PAGE')
        messages = self.msg.get_messages().json().get('items')
        self.assertGreater(len(messages), 0)
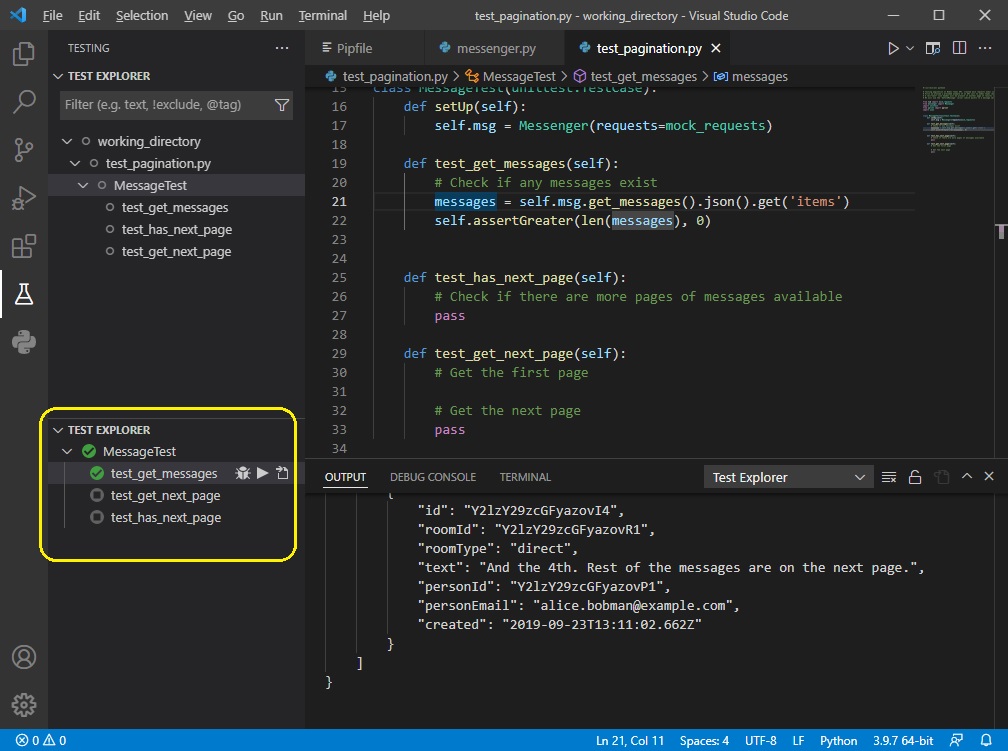
Click the Test icon in the sidebar and expand the MessageTest class in the Test Explorer panel by clicking the arrow on the left.
In some cases the Test Explorer panel might be displayed under the PYTHON panel. If so, you can drag it to the top, to have the same layout as shown in this procedure.
This action launches the Test Explorer UI extension with the Python Test Explorer for Visual Studio Code adapter. These extensions allow you to run Python unittest tests from the Visual Studio Code sidebar. Three tests have been identified: test_get_messages, test_has_next_page and test_get_next_page methods of the MessageTest class.
Run the unit test by first clicking the test in the TEST EXPLORER panel, and then clicking the arrow next to the test.
test get message
Examine the output in the OUTPUT section of the terminal:
Requesting https://api.ciscospark.com/v1/messages?roomId=Y2lzY29zcGFyazovR1&max=3
{
    "items": [
        {
            "id": "Y2lzY29zcGFyazovI6",
            "roomId": "Y2lzY29zcGFyazovR1",
            "roomType": "direct",
            "text": "This is the last message in this room.",
            "personId": "Y2lzY29zcGFyazovP1",
            "personEmail": "alice.bobman@example.com",
            "created": "2019-09-23T13:11:06.103Z"
        },
        {
            "id": "Y2lzY29zcGFyazovI5",
            "roomId": "Y2lzY29zcGFyazovR1",
            "roomType": "direct",
            "text": "The 5th message.",
            "personId": "Y2lzY29zcGFyazovP2",
            "personEmail": "bob.aliceman@example.com",
            "created": "2019-09-23T13:11:04.438Z"
        },
        {
            "id": "Y2lzY29zcGFyazovI4",
            "roomId": "Y2lzY29zcGFyazovR1",
            "roomType": "direct",
            "text": "And the 4th. Rest of the messages are on the next page.",
            "personId": "Y2lzY29zcGFyazovP1",
            "personEmail": "alice.bobman@example.com",
            "created": "2019-09-23T13:11:02.662Z"
        }
    ]
}
Check for More Data
Now you have retrieved the first page of messages from the Webex Teams API. In this procedure, you will add code to verify if there are more pages of messages available for this room.
In messenger.py look at the has_next_page method.
This method uses the existing _get_parsed_link_header method to check if the Link header is present in the API response and sets the api_url to the value in the header. If the header is not present, it returns False.
In test_pagination.py look at the the test_has_next_page output function.
This code checks if an HTTP Link header is present in the API response.
Run the unit test by first clicking the test in the TEST EXPLORER panel, and then clicking the arrow next to the test.
<... output omitted ...>
PARSED Link HEADER
{
    "rel": "next",
    "url": "https://api.ciscospark.com/v1/messages?roomId=Y2lzY29zcGFyazovR1&max=3&beforeMessage=Y2lzY29zcGFyazovI4",
    "params": {
        "roomId": [
            "Y2lzY29zcGFyazovR1"
        ],
        "max": [
            "3"
        ],
        "beforeMessage": [
            "Y2lzY29zcGFyazovI4"
        ]
    }
}
You have now determined that the response contains a Link header, which means that there are additional messages posted in the space. You have identified the ID of the last message on the current page.
In the test_get_next_page procedure, the code requests the next page of the results.
The next three messages in the space will be listed.
These are the messages that were posted chronologically before the message with the ID that equals the beforeMessage parameter in the Link header URL.
This code retrieves the first and the next page of the messages.
Run the unit test by first clicking the test in the TEST EXPLORER panel, and then clicking the arrow next to the test.
Notice that the requested resource URL now contains the beforeMessage parameter with the value set by the next_page method. You have retrieved the next three messages that are posted in the room.
Step 3: Create a Webex Teams Account
If you have not yet done so, create a Webex Teams account in order to access the Webex Teams API. Verify that your account is active by logging into https://teams.webex.com. If you have a Webex Teams account, you can skip this stage.
Type teams.webex.com in the address bar and press Enter.
Once you’ve created and Cisco Webex account, open Google Chrome. Find the Webex activation email from Cisco and click the Get Started button:
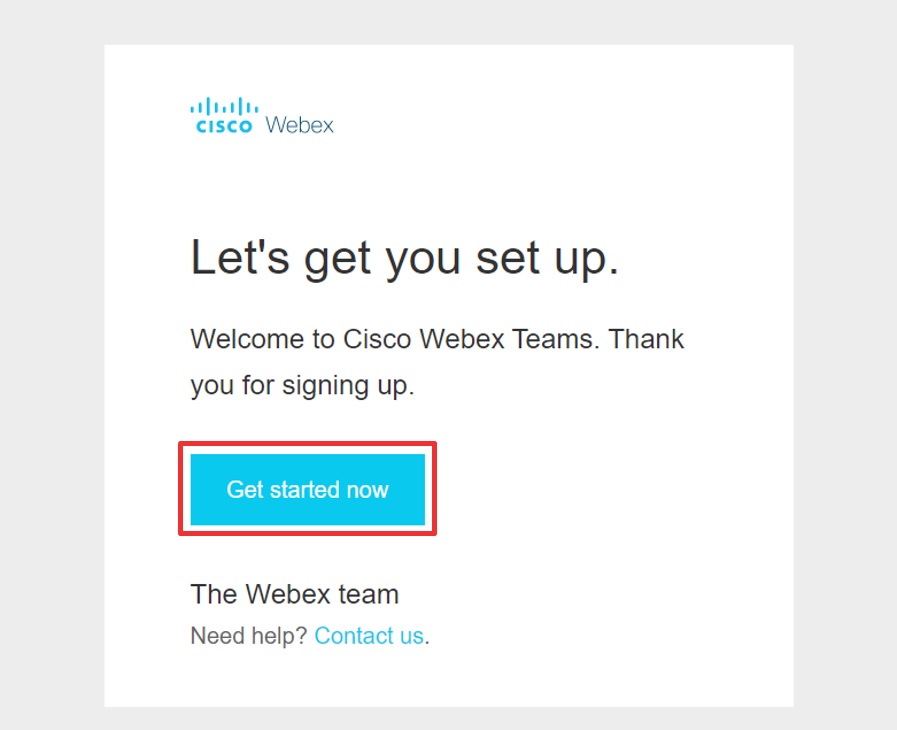
Webex get started
Wait for the activation process to complete.
A new browser tab will open and you will be prompted to create a password
Type a secure password in the Password field, then click the Create Account button.
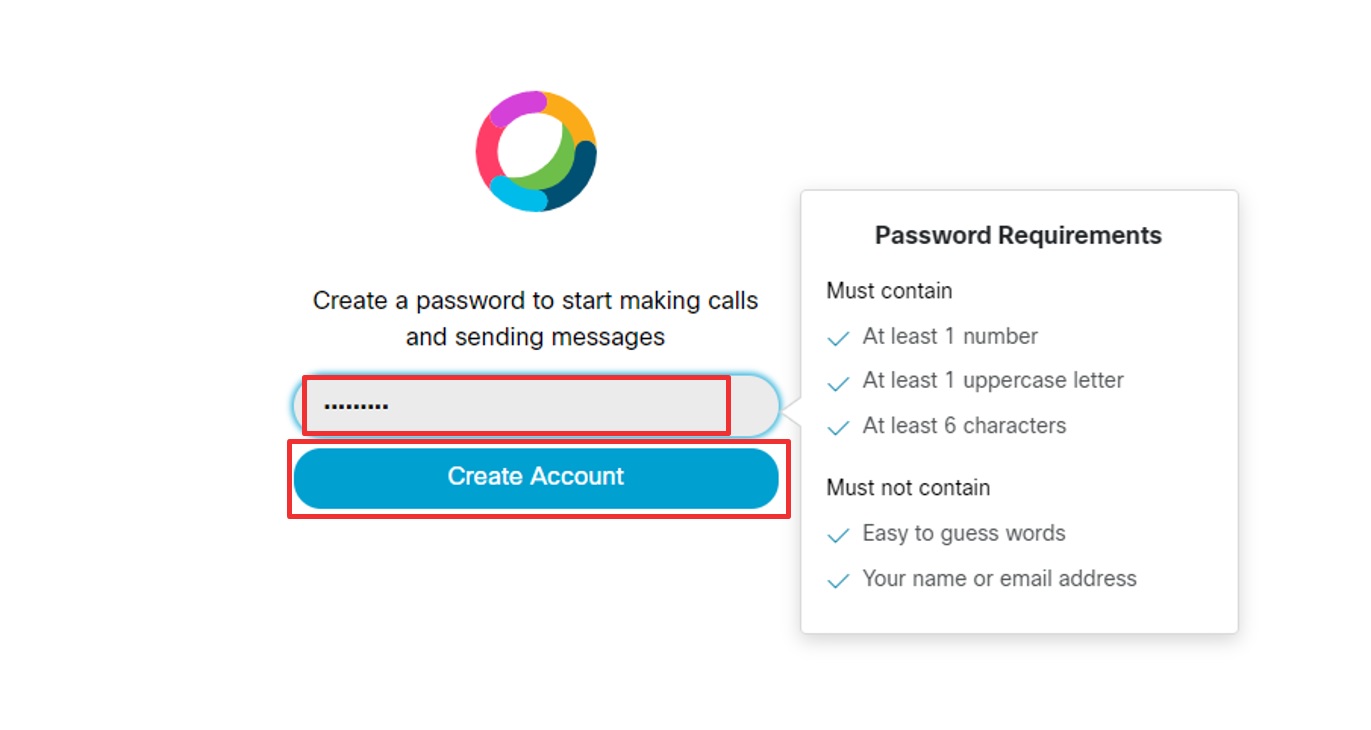
webex create account
The Cisco Webex Teams web application will open. Click the Got it button to close the welcome window. You are now logged in to Webex Teams.
Step 4. Create a New Webex Teams App
Create a new app on the Webex Teams developer portal. The app will be a chatbot, which you will communicate with using the Webex Teams API.
From the Desktop, open Google Chrome if it is not already open; open a new tab if it is already open.
Type https://developer.webex.com in the browser address bar and press Enter.
Click the Start Building Apps button.
start building apps
Click the Create a Bot button.
Type a name for the bot into the Bot Name field and a unique username for the bot in the Bot Username field. This is the ID that Webex Teams users can use to add this bot to a space. It cannot be changed later.
Choose an icon for your bot. Note that the display name shown in the screenshots here and in later steps is for example purposes only; use your own display name.
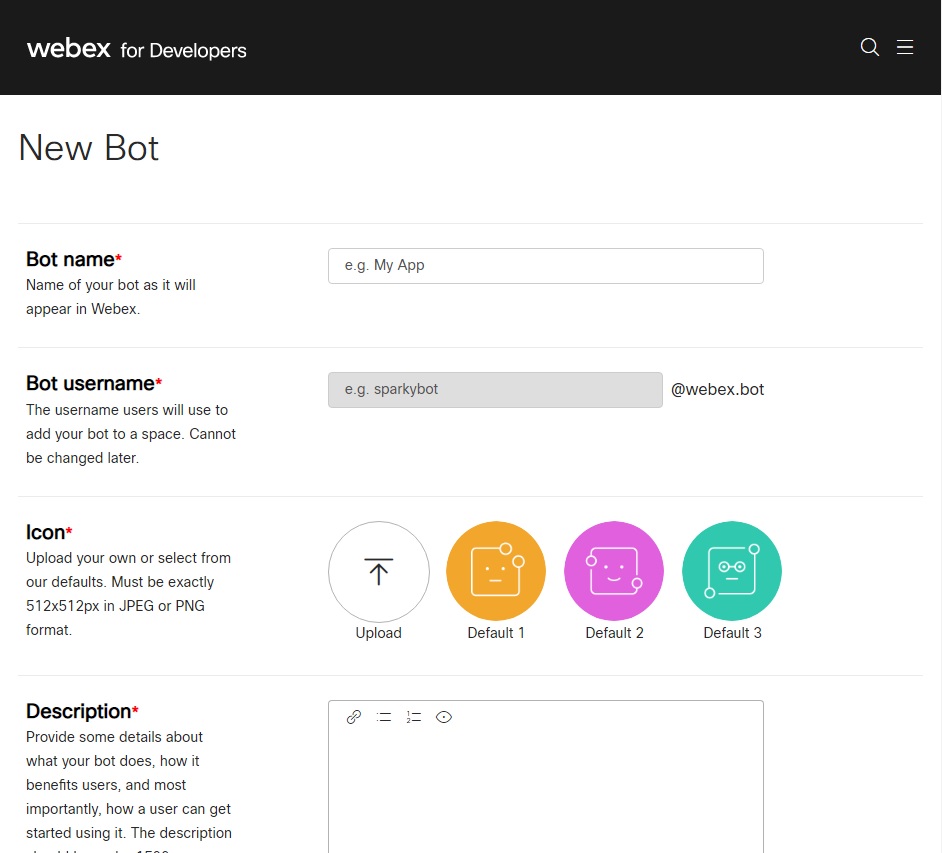
create new webex bot
You have created a chatbot. You can send messages and communicate with the bot in the same way you would with any other Webex Teams user. To do that, you need to collect the bot’s access token and username.
Open a text editor such as Notepad.
In the Bot’s Access Token section, click the Copy button to copy the token to your clipboard and save it in the text file. Note that your token will be different than the one shown in the example screenshot; each bot token is unique.
To communicate with the bot through the Webex Teams client, you need to know the bot’s username to add it to a room. Copy the Bot Username email address to your clipboard and save it in the text file.
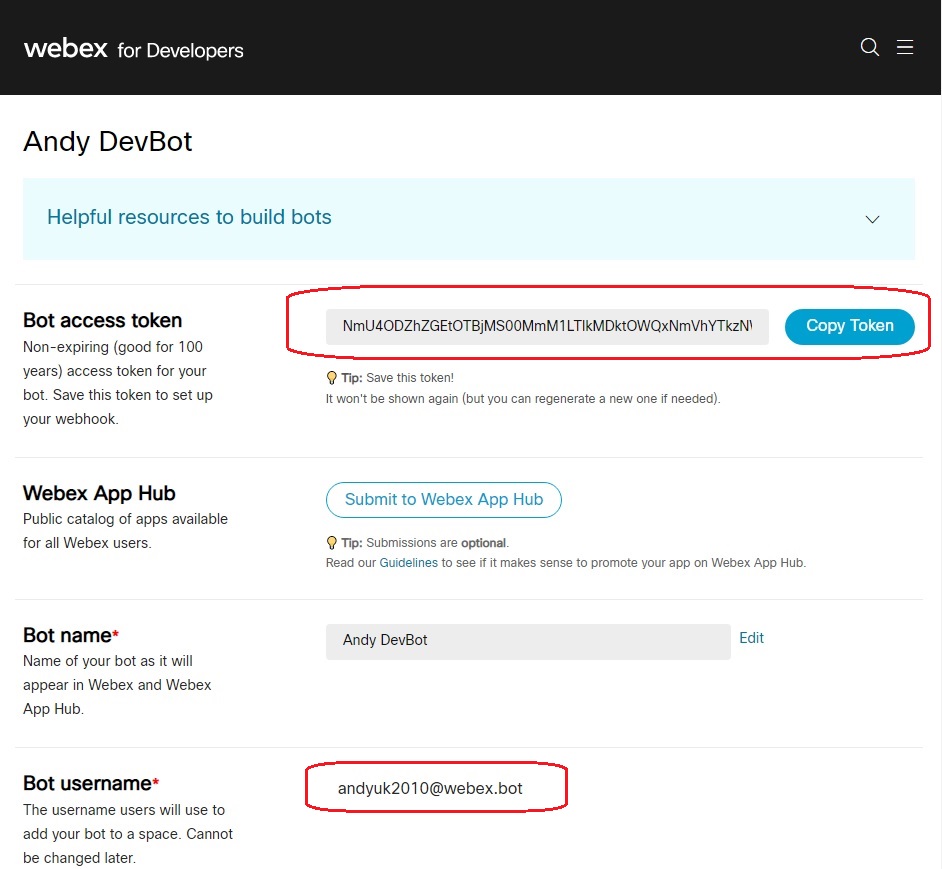
access token & username
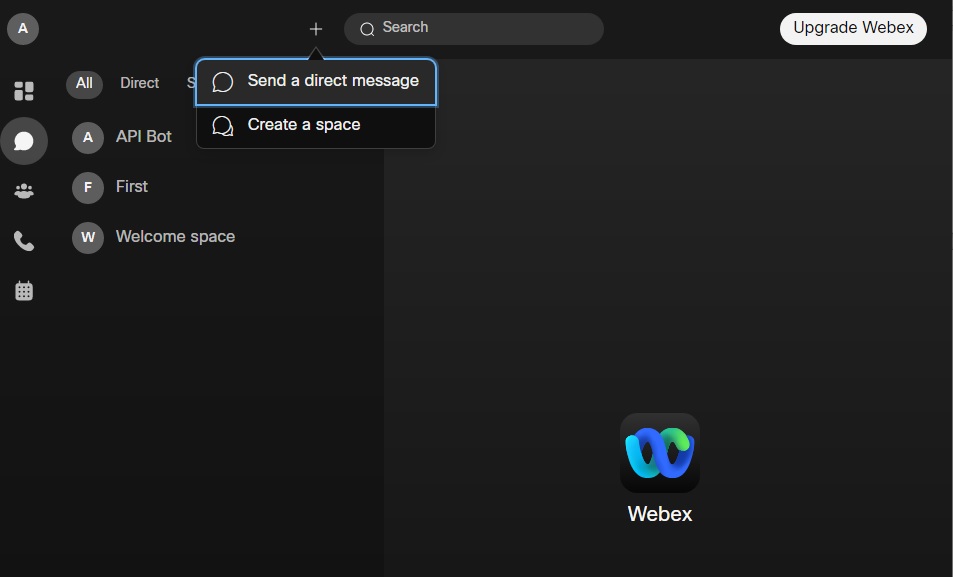
Return to, or open in another tab, the Webex Teams web client at https://teams.webex.com, click the ( + ) icon and choose Send a direct message from the drop-down menu:
send message
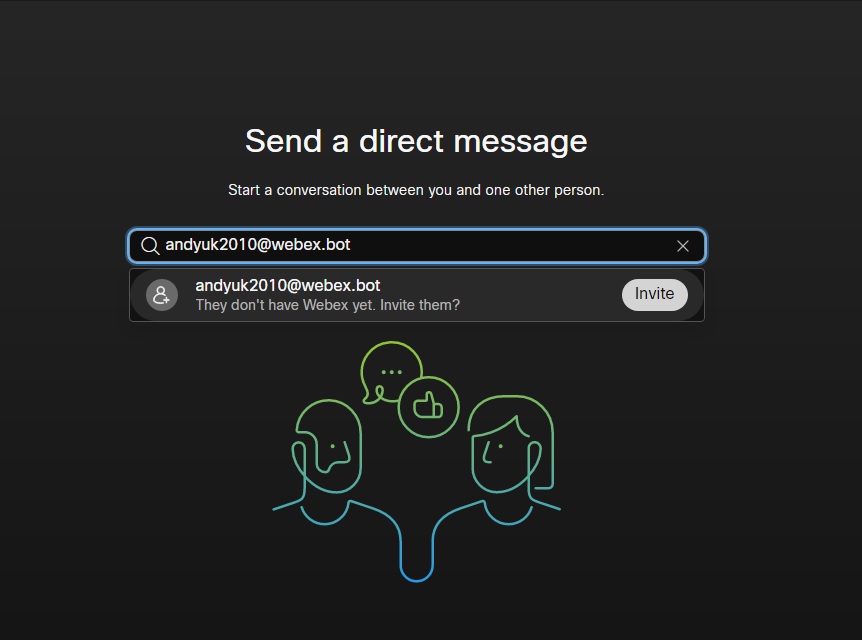
Paste your bot’s username email address and press Invite in the drop down:
invite
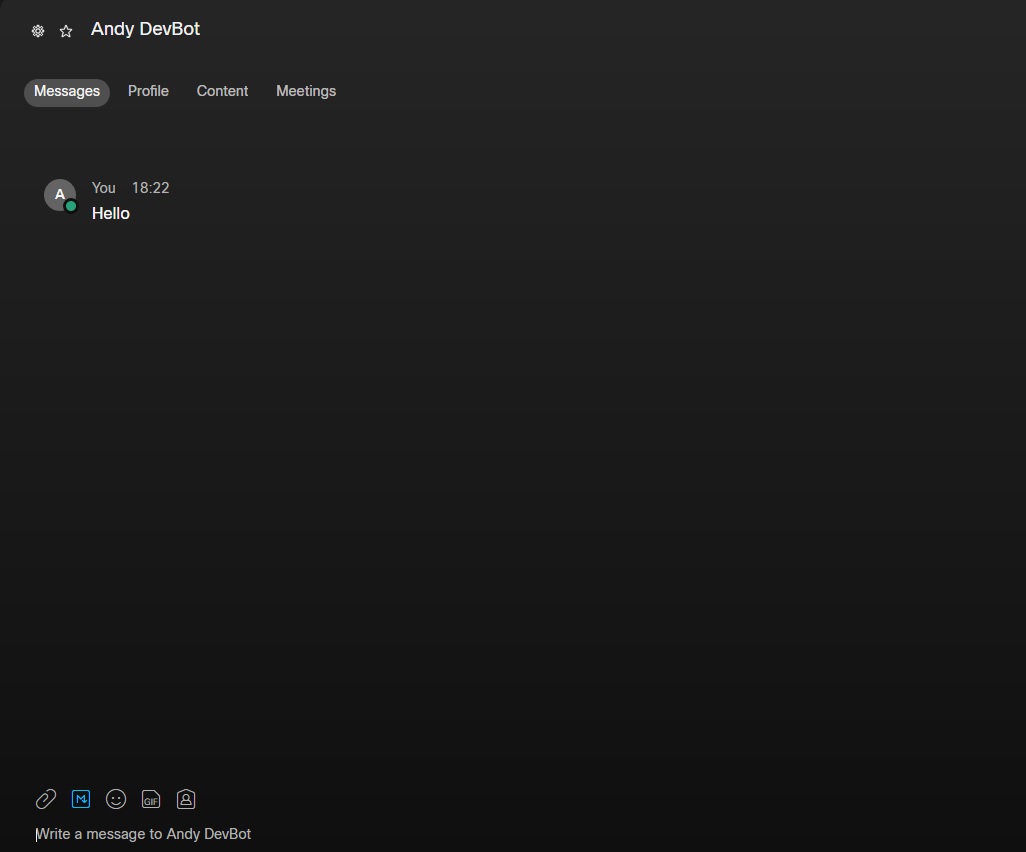
The bot has been successfully added. Type Hello in the Write a message to field and press Enter. Observe the panel. You can see the message that you sent to the room.
Hello
Step 5. Test the Live API Endpoint
So far, you were working with a mock Webex Teams API. By using dependency injection, you utilized a mock Python requests library to simulate the Webex Teams API responses, and the Python unittest library to execute the tests.
In this section, you will add code to perform the same requests on the live Webex Teams API. This will require the API key of your Webex Teams bot and the room ID of the direct room that is shared between you and your bot.
In Visual Studio Code, open the messenger.py file.
Paste the API key that you collected from the Webex Teams developer website to the value of the api_key variable.
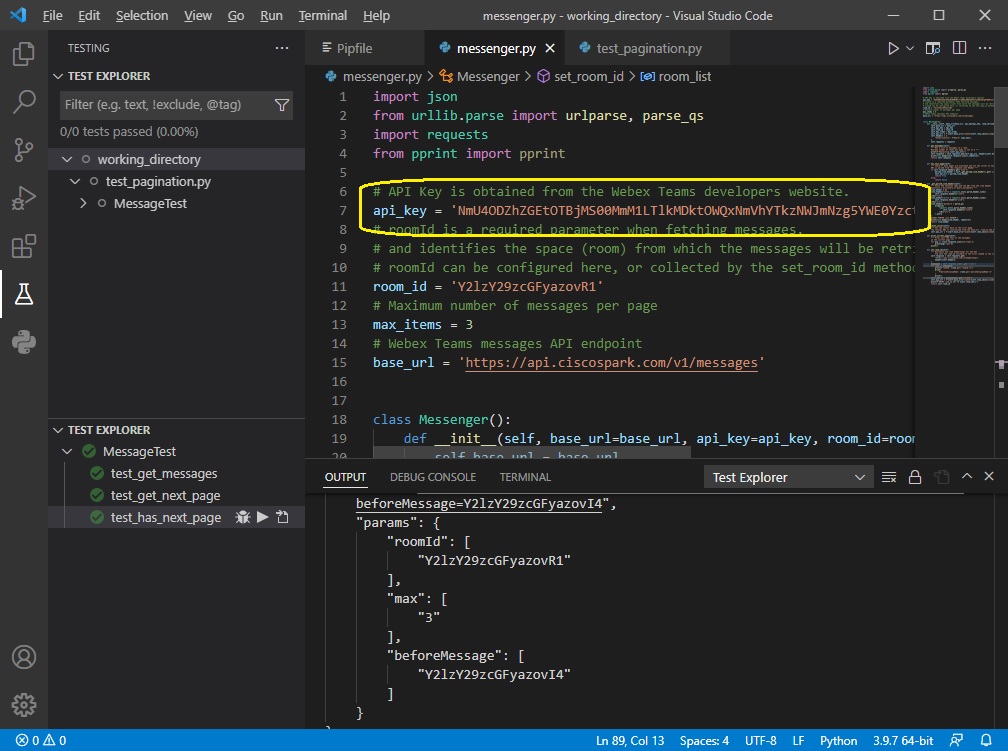
API key
If you have the room ID, paste it to the value of the room_id variable. If you do not have the room ID, inspect the set_room_id method in the Messenger class, which fetches the roomId of the direct room with your chatbot.
  def set_room_id(self):
        """ Retrieves the room memberships for the bot
            and sets the room_id variable to the first roomId in the list """
        self.response = self.requests.get(
            "https://api.ciscospark.com/v1/memberships",
            headers=self.headers,
        )
        room_list = self.response.json().get("items")
        for room in room_list:
            print(f"roomId: {room.get('roomId')}")
            print(
                f"personDisplayName: {room.get('personDisplayName')}"
            )
            print()
        self.room_id = room_list[0].get("roomId")
        self.api_url = f"{self.base_url}?roomId={self.room_id}&max={max_items}"
        print(f"##### room_id SET TO {self.room_id}\n")
        return self.room_id
In Visual Studio Code, open the main.py file.
A new instance of the Messenger class is initialized, this time without passing the requests attribute. The requests module is used to make API calls. The set_room_id method is called to fetch the room ID, and some actions are made for requesting messages from the specified room. The print_current_page method is called, which prints only the message text. A maximum of three pages are retrieved. At the end, the cursor is reset to the first page and the first three messages are printed again.
from messenger import Messenger

if __name__ == "__main__":
    msg = Messenger()
    msg.set_room_id()

    # Get first page
    print('GET FIRST PAGE')
    msg.get_messages()
    msg.print_current_page()

    page_number = 1
    while page_number <= 3 and msg.has_next_page() is True:
        print(f'MESSAGES ON PAGE {page_number}')
        msg.get_messages()
        msg.print_current_page()
        page_number += 1

    # Reset cursor to first page
    print('RESET TO FIRST PAGE')
    msg.reset_cursor()
    print('GET FIRST PAGE')
    msg.get_messages()
    msg.print_current_page()
Run the main.py file from the terminal.
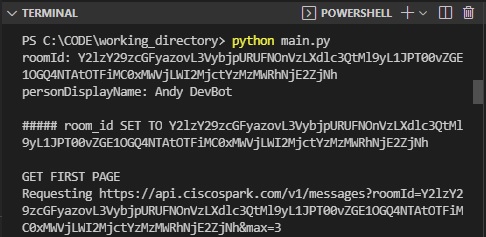
run main.py
##### room_id SET TO Y2lzY29zcGFyazovL3VybjpURUFNOnVzLXdlc3QtMl9yL1JPT00vZGE1OGQ4NTAtOTFiMC0xMWVjLWI2MjctYzMzMWRhNjE2ZjNh

GET FIRST PAGE
Requesting https://api.ciscospark.com/v1/messages?roomId=Y2lzY29zcGFyazovL3VybjpURUFNOnVzLXdlc3QtMl9yL1JPT00vZGE1OGQ4NTAtOTFiMC0xMWVjLWI2MjctYzMzMWRhNjE2ZjNh&max=3
{
    "items": [
        {
            "id": "Y2lzY29zcGFyazovL3VybjpURUFNOnVzLXdlc3QtMl9yL01FU1NBR0UvMmNhOTYyYTAtOTFiMS0xMWVjLTk3N2UtMzM4MTEzNzJmY2Ix",
            "roomId": "Y2lzY29zcGFyazovL3VybjpURUFNOnVzLXdlc3QtMl9yL1JPT00vZGE1OGQ4NTAtOTFiMC0xMWVjLWI2MjctYzMzMWRhNjE2ZjNh",
            "roomType": "direct",
            "text": "Heck!",
            "personId": "Y2lzY29zcGFyazovL3VzL1BFT1BMRS9jM2JhMzJkNi1kMmQ4LTRhOGUtOGIyZi0wZTQxNTkxYTc4ZGU",
            "personEmail": "andyuk2010@gmail.com",
            "created": "2022-02-19T18:24:28.618Z"
        },
        {
            "id": "Y2lzY29zcGFyazovL3VybjpURUFNOnVzLXdlc3QtMl9yL01FU1NBR0UvZTI2NDc5ZjAtOTFiMC0xMWVjLWI2MjctYzMzMWRhNjE2ZjNh",
            "roomId": "Y2lzY29zcGFyazovL3VybjpURUFNOnVzLXdlc3QtMl9yL1JPT00vZGE1OGQ4NTAtOTFiMC0xMWVjLWI2MjctYzMzMWRhNjE2ZjNh",
            "roomType": "direct",
            "text": "Hello",
            "personId": "Y2lzY29zcGFyazovL3VzL1BFT1BMRS9jM2JhMzJkNi1kMmQ4LTRhOGUtOGIyZi0wZTQxNTkxYTc4ZGU",
            "personEmail": "andyuk2010@gmail.com",
            "created": "2022-02-19T18:22:24.015Z"
        }
    ]
}
Heck!
Hello

RESET TO FIRST PAGE
GET FIRST PAGE
Requesting https://api.ciscospark.com/v1/messages?roomId=Y2lzY29zcGFyazovL3VybjpURUFNOnVzLXdlc3QtMl9yL1JPT00vZGE1OGQ4NTAtOTFiMC0xMWVjLWI2MjctYzMzMWRhNjE2ZjNh&max=3
{
    "items": [
        {
            "id": "Y2lzY29zcGFyazovL3VybjpURUFNOnVzLXdlc3QtMl9yL01FU1NBR0UvMmNhOTYyYTAtOTFiMS0xMWVjLTk3N2UtMzM4MTEzNzJmY2Ix",
            "roomId": "Y2lzY29zcGFyazovL3VybjpURUFNOnVzLXdlc3QtMl9yL1JPT00vZGE1OGQ4NTAtOTFiMC0xMWVjLWI2MjctYzMzMWRhNjE2ZjNh",
            "roomType": "direct",
            "text": "Heck!",
            "personId": "Y2lzY29zcGFyazovL3VzL1BFT1BMRS9jM2JhMzJkNi1kMmQ4LTRhOGUtOGIyZi0wZTQxNTkxYTc4ZGU",
            "personEmail": "andyuk2010@gmail.com",
            "created": "2022-02-19T18:24:28.618Z"
        },
        {
            "id": "Y2lzY29zcGFyazovL3VybjpURUFNOnVzLXdlc3QtMl9yL01FU1NBR0UvZTI2NDc5ZjAtOTFiMC0xMWVjLWI2MjctYzMzMWRhNjE2ZjNh",
            "roomId": "Y2lzY29zcGFyazovL3VybjpURUFNOnVzLXdlc3QtMl9yL1JPT00vZGE1OGQ4NTAtOTFiMC0xMWVjLWI2MjctYzMzMWRhNjE2ZjNh",
            "roomType": "direct",
            "text": "Hello",
            "personId": "Y2lzY29zcGFyazovL3VzL1BFT1BMRS9jM2JhMzJkNi1kMmQ4LTRhOGUtOGIyZi0wZTQxNTkxYTc4ZGU",
            "personEmail": "andyuk2010@gmail.com",
            "created": "2022-02-19T18:22:24.015Z"
        }
    ]
}
Hello
You have now performed the same tasks of fetching messages and turning pages on the live Webex Teams API.